
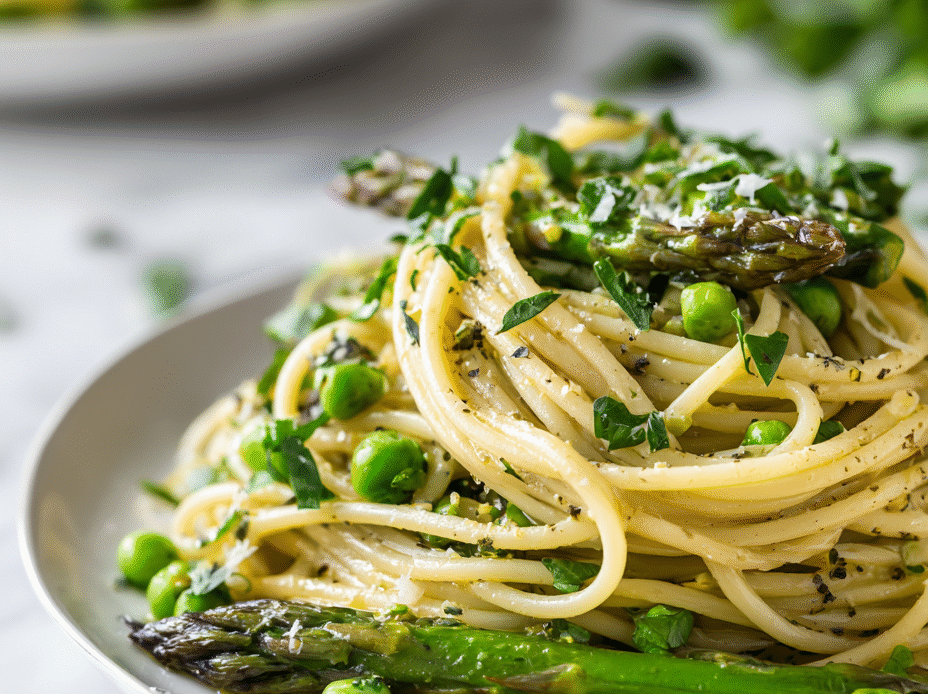
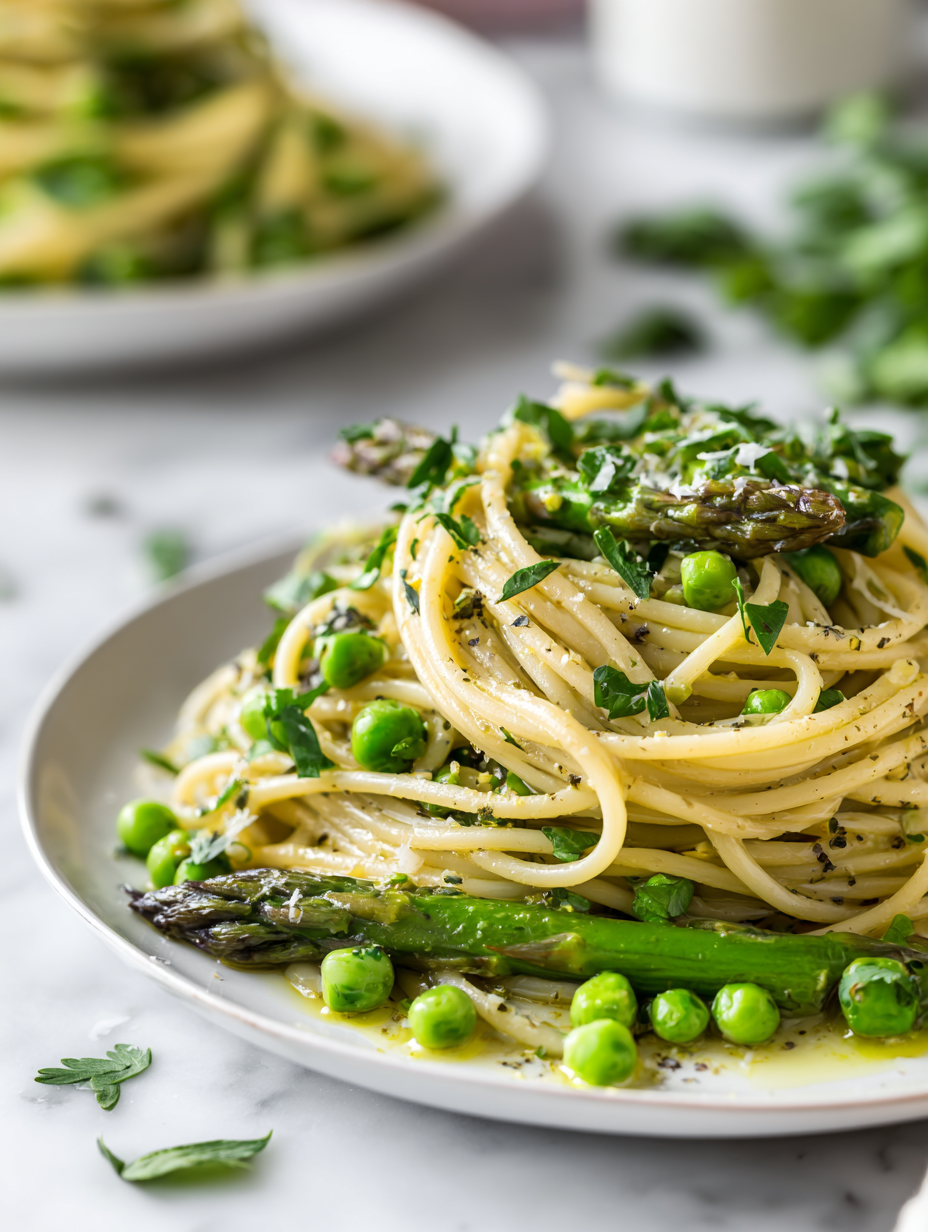
Spring’s fleeting greens often get overlooked, but this pasta recipe makes their brief season feel like a celebration. It’s a reminder to slow down and really notice the vibrant, sweet crunch of asparagus and the pop of fresh peas. Cooking them gently keeps their bright flavor alive, almost like tasting a breath of fresh air in every bite.
This dish is more than just a quick meal; it’s about appreciating the delicate beauty of seasonal produce. I love how the simple act of sautéing these greens can turn a humble plate into something that feels lively and special. It’s the kind of recipe that invites you to savor each element and get a little more connected to spring’s brief, beautiful window.
Focusing on the overlooked beauty of seasonal greens, this recipe elevates asparagus and peas from simple side to main event, highlighting their fleeting freshness and vibrant flavors in a way that makes you notice the small, joyful details of spring.
The story behind this recipe
- I first made this pasta on a busy spring evening, trying to use up the last of the season’s greens before they vanished. The bright green snap of fresh peas and the tender, slightly smoky asparagus always remind me of early mornings in the garden, when everything feels just on the verge of bursting into bloom.
- One time, I accidentally overcooked the peas a bit—turning them mushy—and instead of tossing the dish, I sautéed a little more garlic and tossed in a squeeze of lemon. That accidental tweak turned into a favorite trick for balancing the natural sweetness with a zing of brightness.
- heading: ‘The story behind this recipe’
Ingredient breakdown
- Asparagus: I love how the tips stay tender yet slightly crisp, adding a fresh, grassy aroma. Try slicing thicker stalks for more bite.
- Peas: Their burst of sweetness is the highlight, especially if you add them right at the end. Fresh peas give the best pop, but frozen work in a pinch—just defrost first.
- Pasta: I prefer a sturdy shape like rigatoni or cavatappi that catches bits of greens. Cook until just al dente, then toss to keep the texture firm and lively.
- Olive oil: Use good-quality extra virgin; it brings a fruity, peppery note that complements the greens. Don’t skimp—they make a real difference.
- Lemon: Brightens everything with its zesty, citrus punch. I zest first, then squeeze for a clean, sharp flavor that cuts through the richness.
- Garlic: I crush mine to release more aroma, but if you prefer a milder taste, slice thin and sauté gently until golden. The smell should be nutty and inviting.
- Parmesan: Freshly grated adds a salty, umami kick, but if you’re dairy-free, nutritional yeast can mimic that cheesy depth without the richness.
Spotlight on key ingredients
Asparagus and Peas:
- Asparagus: I love how the tips stay tender yet slightly crisp, adding a fresh, grassy aroma. Try slicing thicker stalks for more bite.
- Peas: Their burst of sweetness is the highlight, especially if you add them right at the end. Fresh peas give the best pop, but frozen work in a pinch—just defrost first.
Notes for ingredient swaps
- Dairy-Free: Swap Parmesan for nutritional yeast. It adds a cheesy umami without the richness, though it’s a bit milder in flavor.
- Vegetarian: Use smoked paprika instead of bacon bits for a smoky depth. It’s less salty but still adds warmth.
- Gluten-Free: Replace regular pasta with chickpea or rice pasta. Keep an eye on cooking times—they can vary more than wheat pasta.
- Vegan: Omit cheese and add a splash of tahini or a squeeze of lemon for brightness. Creaminess is harder but still achievable.
- Herb Variations: Toss in fresh basil or mint instead of parsley for a different fresh punch. Each adds a unique aromatic note.
- Peas: Use snow peas or sugar snap peas for a crisper, slightly sweeter bite. Adjust cooking time to keep their crunch.
- Lemon: Substitute with a splash of white wine vinegar or apple cider vinegar for acidity if lemon isn’t available. Use sparingly, as the flavor is sharper.
Equipment & Tools
- Large pot: Boil pasta efficiently in salted water
- Skillet or frying pan: Sauté and toss greens and pasta
- Tongs: Mix and handle hot pasta and greens
- Pasta strainer: Drain pasta without losing bits
- Sharp knife: Prepare vegetables precisely
Step-by-step guide to asparagus and pea pasta
- Gather your equipment: a large pot for boiling, a skillet for sautéing, tongs, a pasta strainer, and a sharp knife. These will help you cook efficiently and keep everything organized.
- Bring a large pot of salted water to a rolling boil, about 100°C (212°F). Add the pasta and cook until just al dente, about 8 minutes. Stir occasionally to prevent sticking.
- While pasta cooks, prep the greens: trim the woody ends of the asparagus, cut into 2-inch pieces, and peel the tougher stalks if needed. Shell the peas if using fresh ones.
- Heat a good glug of olive oil (about 2 tablespoons) in your skillet over medium heat (~160°C/320°F). Once warm, add the asparagus tips. Sauté for 3-4 minutes until tender and slightly blistered, then add the peas for the last minute. The aroma should turn grassy with a hint of smoky sweetness.
- Drain the pasta, reserving a cup of pasta water. Add the cooked pasta to the skillet with the greens. Toss gently to combine, adding a splash of reserved pasta water if needed to loosen the sauce.
- Add freshly grated lemon zest and a squeeze of lemon juice, along with minced garlic (about 1 teaspoon). Toss again, letting the flavors meld for 1-2 minutes over low heat. The garlic should turn fragrant, and the mixture should shimmer.
- Finish by stirring in freshly grated Parmesan or a dairy-free alternative, and season with salt and pepper to taste. The pasta should look bright, glistening, and lively.
- Remove from heat and let it sit for a minute. Resting allows the flavors to settle. Plate with a final drizzle of olive oil and extra Parmesan if desired.
- Check for doneness: the asparagus tips are tender with a slight crunch, peas are bright and popping, and the pasta is perfectly al dente, holding its shape without being mushy.
Let the pasta rest for a minute after turning off heat, so flavors meld. Finish with a drizzle of olive oil and extra Parmesan for richness. Serve immediately, ensuring greens are vibrant and pasta is glossy.
How to Know It’s Done
- Asparagus tips are tender and slightly blistered, with a smoky aroma.
- Peas are bright, tender, and bursting with sweetness.
- Pasta is al dente, firm but cooked through, with a slight resistance when bitten.
Spring Asparagus and Pea Pasta
Ingredients
Equipment
Method
- Bring a large pot of salted water to a rolling boil. Add the pasta and cook until just al dente, about 8 minutes, stirring occasionally. Drain, reserving a cup of pasta water, and set aside.
- While the pasta cooks, prepare the greens: trim the woody ends from the asparagus and cut into 2-inch pieces. Shell the peas if using fresh.
- Heat the olive oil in a skillet over medium heat until shimmering. Add the asparagus tips and sauté for about 3-4 minutes until they develop a slight char and become tender yet crisp. Add the peas during the last minute of sautéing, just until heated through.
- Drain the pasta and add it to the skillet with the greens. Toss gently to combine, adding a splash of reserved pasta water if needed to loosen the mixture and help the flavors meld.
- Add the lemon zest and squeeze in the lemon juice, then sprinkle the minced garlic over everything. Toss again to evenly distribute the flavors, cooking for about 1-2 minutes until fragrant.
- Stir in the freshly grated Parmesan cheese, and season with salt and pepper to taste. The dish should look glossy, vibrant, and inviting.
- Remove from heat and let sit for a minute to allow the flavors to meld. Finish with a drizzle of olive oil and an extra sprinkle of Parmesan if desired.
- Serve immediately while the greens are bright and the pasta is perfectly al dente, enjoying the lively flavors of spring in every bite.
Pro tips for perfect asparagus and pea pasta
- & crispy: Sauté asparagus tips until they develop a slight char for a smoky flavor.
- Bright & fresh: Add lemon zest at the end to preserve its zesty brightness and aromatic oils.
- Gently does it: Cook garlic on medium-low to avoid bitterness and keep its nutty scent intact.
- Salt the water well: It should taste like the sea—this seasons the pasta from inside out.
- Reserve pasta water: Use it to loosen the sauce, adding silkiness and helping flavors cling.
- Taste as you go: Adjust seasoning gradually—peppers, lemon, salt—to find your perfect balance.
- Don’t rush: Rest the pasta a minute after draining to allow flavors to meld and greens to settle.
Common asparagus and pea pasta mistakes
- FORGOT to check pasta saltiness → Taste the water; it should taste like the sea.
- DUMPED greens too early → Sauté asparagus tips until slightly charred, then add peas for color.
- OVER-TORCHED garlic → Cook garlic gently until fragrant, about 30 seconds, to avoid bitterness.
- SKIPPED reserving pasta water → Use it to loosen the sauce, it adds silkiness and flavor.
Quick fixes and pantry swaps
- When in doubt, splash extra olive oil to loosen a stubborn sauce and shimmer.
- If greens wilt too much, quickly toss in a squeeze of lemon to refresh their brightness.
- DUMPED the pasta water? Use a splash of broth or plain water to help loosen the sauce.
- Overcooked the peas? Patch it with a little fresh lemon zest for a pop of brightness.
- Splash some extra olive oil if the dish feels dry or dull, adding shimmer and richness.
Prep, store, and reheat tips
- Prepare the vegetables: trim and cut asparagus, shell peas if fresh, and have everything ready to toss. This saves time and keeps the greens vibrant.
- Cook the pasta ahead: boil until just al dente, then drain and toss with a little olive oil. Store in an airtight container in the fridge for up to 24 hours—pasta can absorb flavors and become a bit sticky.
- Refrigerate separately: keep the cooked greens and pasta separate to prevent mushiness and preserve their textures. Both will stay fresh for up to a day in airtight containers.
- Reheat with care: warm the pasta and greens gently in a skillet over low heat or briefly microwave, adding a splash of olive oil or reserved pasta water. Watch for a slight shimmer and fragrant aroma to ensure they’re heated through without drying out.
Top questions about asparagus and pea pasta
1. Can I use frozen peas instead of fresh?
Use fresh or frozen peas; fresh give a better pop, but frozen works well and is more convenient.
2. How long should I cook the asparagus?
Cook the asparagus until tender-crisp, about 3-4 minutes, so they keep their bright flavor and slight bite.
3. Can I make this gluten-free?
Yes, swap out gluten-free pasta like chickpea or rice for regular pasta, but adjust cooking times accordingly.
4. How do I keep the dish bright and fresh?
Add a squeeze of lemon juice right before serving for a fresh, zesty brightness that complements the greens.
5. Why should I save pasta water?
Reserve some pasta water before draining; it’s great for loosening the sauce and adding silkiness.
6. Can I use regular olive oil?
Use good-quality extra virgin olive oil; it adds a fruity, peppery note that really enhances the dish.
7. How do I know when the pasta is done?
Cook the pasta until just al dente, then toss it with the greens immediately for the best texture.
8. How do I season this dish properly?
Adjust seasoning gradually, tasting and adding salt, pepper, or lemon in small amounts to balance flavors.
9. Can I make it ahead of time?
This dish is best served immediately to enjoy the vibrant greens and al dente pasta while fresh.
10. How do I fix over-wilted greens when reheating?
If the greens are too wilted after reheating, toss in a little fresh lemon zest or herbs for a quick lift.
This pasta brings a quiet celebration of spring into your kitchen, with its fresh, bright flavors and simple elegance. It’s the kind of dish that makes you pause and appreciate the fleeting beauty of seasonal greens. Sometimes, it’s these unassuming recipes that remind us to slow down and savor the small, vibrant moments of the season.
A plate of asparagus and peas isn’t just a meal; it’s a gentle reminder to notice the details—the crisp green stalks, the pop of sweet peas, the zesty lemon—that make cooking feel alive and meaningful.

Hi, I’m Jonny Andrew Miller, the cook, taster, and slightly messy mind behind Bite & Boom. I live in Austin, Texas, a city that smells like barbecue smoke, fresh tortillas, and late-night tacos if you wander long enough. It suits me.
