
This butter garlic peas recipe is all about transforming something humble into a small, fragrant moment of pleasure. I love how a simple handful of peas, when coated in melting butter and fragrant garlic, becomes unexpectedly decadent. It’s the kind of side that feels like a cozy secret, perfect for quick weeknight dinners or a lazy weekend snack.
There’s something satisfying about the way the garlic sizzles and releases its aroma into the butter, turning the peas glossy and aromatic. It’s a reminder that simple ingredients, treated with care, can deliver the most comforting flavors. Every time I make this, I feel a little more grounded, a tiny celebration of everyday ingredients with a bit of magic.
Focusing on how the simple act of melting butter and fragrant garlic transforms humble peas into a surprisingly decadent side, highlighting the sensory journey from raw ingredients to a glossy, aromatic dish that feels like a small indulgence in everyday life.
The story behind this recipe
- This recipe came from a day when I had an overflowing fridge and a handful of peas that needed using up fast. I remembered how my grandmother used butter and garlic to elevate simple vegetables, turning them into something rich and comforting. That moment of cooking became a reminder that small, humble ingredients can hold a world of flavor, especially when treated with a bit of love and patience.
- Over the years, I’ve kept coming back to this dish whenever I want something quick but satisfying. It’s become my little ritual—sautéing garlic until fragrant, watching the peas turn glossy, and savoring that burst of freshness and richness. It’s a simple pleasure, rooted in memories of family kitchens and the joy of turning everyday ingredients into something special.
- heading: The story behind this recipe
Ingredient breakdown: key components
- Frozen peas: I like how their bright green pops even after a quick thaw; keep an eye out for that vibrant color. Swap with fresh peas if you want a firmer bite and a more delicate sweetness.
- Butter: The secret to that luscious coating. I use unsalted, but if you prefer a saltier punch, go for salted butter and cut back on added salt. The aroma of melting butter is always a comfort.
- Garlic: I crush it just enough to release the fragrance without burning. If you want a milder garlic flavor, chop it finer; for a punch, smash it coarsely and let it toast longer.
- Salt & pepper: I season generously but taste as I go. Consider a pinch of red pepper flakes if you like a subtle heat—just enough to make your nose tingle.
- Lemon juice (optional): I add a squeeze for brightness right before serving. Skip if you prefer a more uniform richness, but that zing really wakes up the dish’s flavor profile.
- Olive oil (optional): A drizzle can add a fruity layer if you want a bit more depth, especially if your butter is a little on the mild side. Use a good-quality extra virgin for best flavor.
- Herbs (like dill or parsley): I toss in fresh herbs at the end for fresh, grassy notes. Dried herbs can work too, but add them earlier to let the flavor bloom.
Spotlight on key ingredients
Butter garlic peas:
- Frozen peas: I love how their bright green pops even after a quick thaw; keep an eye out for that vibrant color. Swap with fresh peas if you want a firmer bite and a more delicate sweetness.
- Butter: The secret to that luscious coating. I use unsalted, but if you prefer a saltier punch, go for salted butter and cut back on added salt. The aroma of melting butter is always a comfort.
- Garlic: I crush it just enough to release the fragrance without burning. If you want a milder garlic flavor, chop it finer; for a punch, smash it coarsely and let it toast longer.
Notes for ingredient swaps
- Fresh peas: I love their snap and sweetness—use fresh if you can find them, but frozen works just fine and is ready in a flash.
- Vegan butter: Swap in plant-based butter for the same richness without dairy, though it might lack a touch of that creamy depth.
- Garlic: Roasted garlic gives a sweeter, mellow flavor—if you prefer milder garlic, try roasting it first before adding.
- Olive oil: Use a neutral oil like canola or grapeseed if you want a more subtle background flavor, especially if your olive oil is extra fruity.
- Lemon juice: Lime juice can brighten the dish with a slightly different citrus note—good for a twist that’s a little more tangy.
- Herbs: Basil or chives can replace parsley or dill, offering fresh, aromatic notes that complement the garlic and butter.
- Salt & pepper: Consider soy sauce or miso paste for umami depth if you want a richer, more savory tweak—use sparingly to avoid overpowering.
Equipment & Tools
- Wide skillet: Ensures even cooking and space for tossing peas.
- Spatula: For tossing and mixing ingredients.
- Sharp knife: To mince garlic finely.
- Measuring spoons: For precise lemon juice or seasoning additions.
Step-by-step guide to butter garlic peas
- Equipment & Tools: Use a wide skillet—helps peas cook evenly and gives space for garlic to sizzle without overcrowding. Have a spatula ready for tossing and a sharp knife for garlic prep.
- Heat the skillet over medium-low (150°C/300°F). Add 2 tbsp butter, let it melt gently—watch for a golden shimmer, not browning.
- Toss in 3-4 minced garlic cloves. Sizzle for about 30 seconds—smell that fragrant burst, but don’t let it burn or turn bitter.
- Add 1 cup of frozen peas (no need to thaw). Stir to coat them in butter and garlic. Cook 2-3 minutes, until peas turn bright green and are heated through.
- Season with salt and pepper—taste and adjust. If using red pepper flakes, toss a pinch in now for a subtle kick.
- Optional: squeeze a teaspoon of lemon juice for brightness. Stir well and cook for another 30 seconds—smell that fresh zing.
- Check peas: they should be tender but not mushy, glossy, and aromatic. If they look dull or dry, add a tiny splash of water or more butter.
- Remove from heat. Rest for 1 minute—allows flavors to meld and prevents overcooking.
- Plate the peas, garnish with chopped herbs if desired. Serve immediately while fragrant and vibrant.
Let the peas rest for a minute off heat. Finish with a squeeze of lemon or fresh herbs. Serve hot, straight from the skillet—best enjoyed immediately to preserve that glossy, fragrant appearance.
How to Know It’s Done
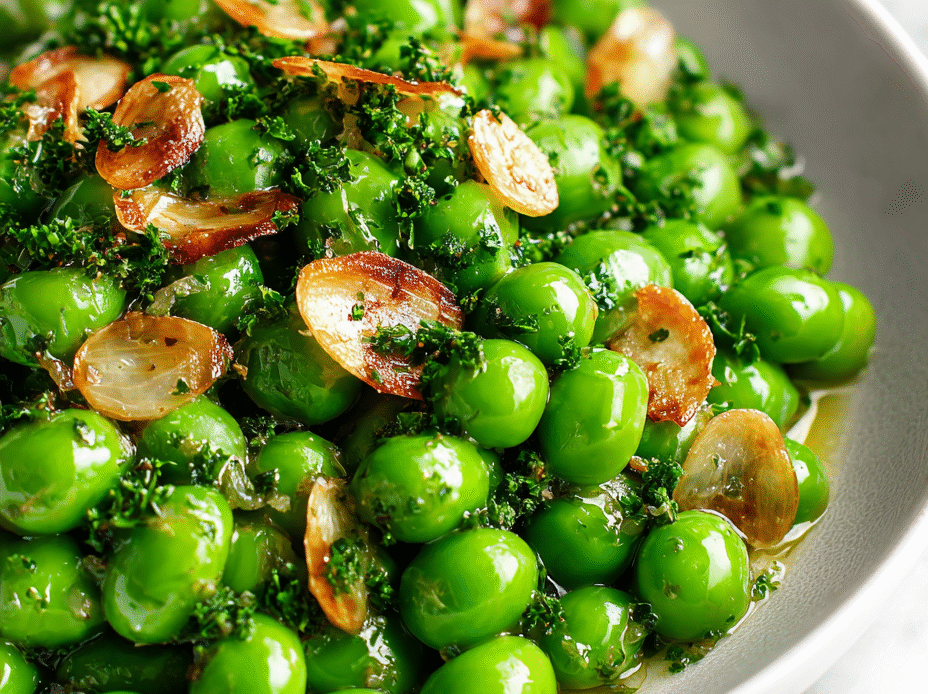
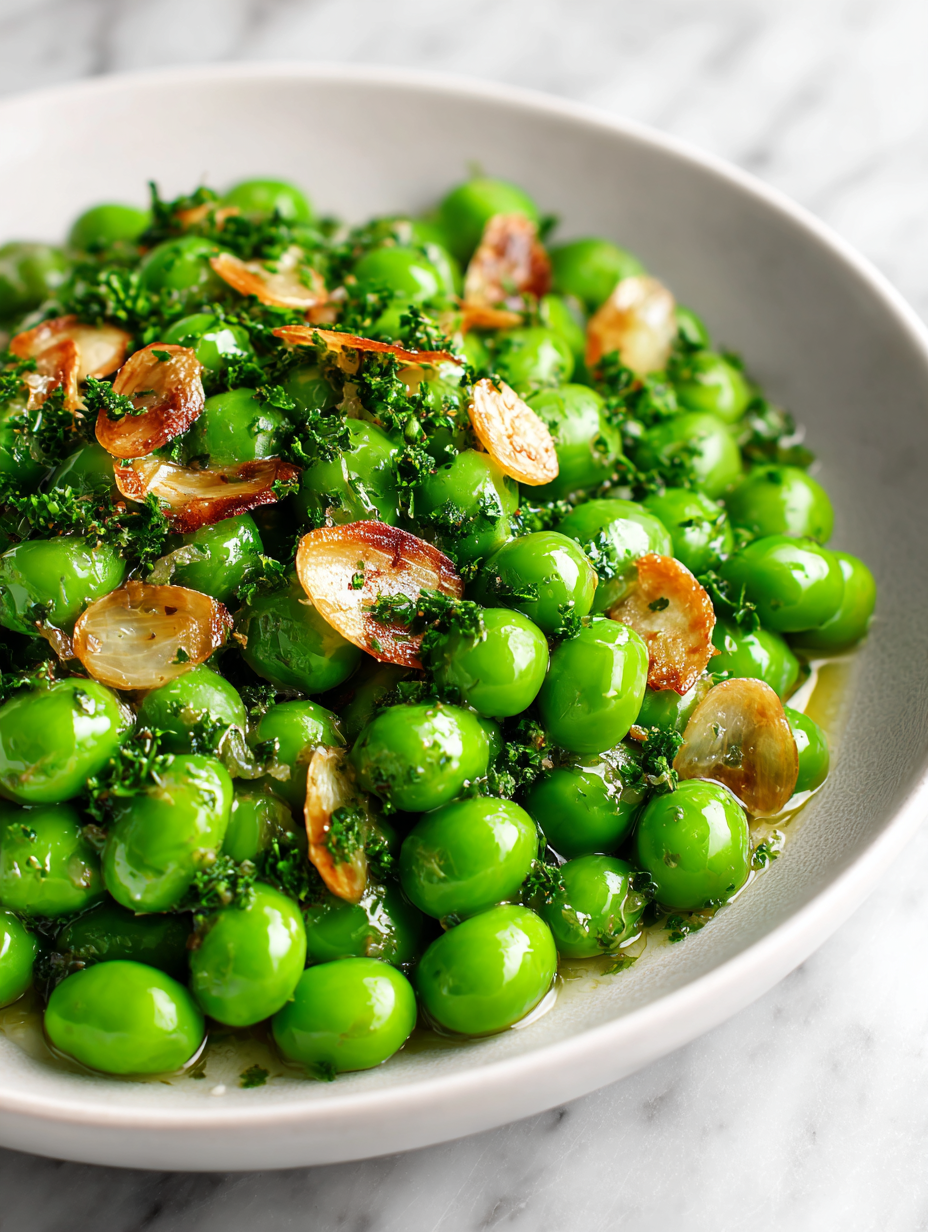
- Peas are bright green and tender but not mushy.
- Butter coats peas evenly, with a slight sheen and aromatic garlic scent.
- Garlic is fragrant but not burnt; golden and crisp around edges.
Butter Garlic Peas
Ingredients
Equipment
Method
- Start by heating a wide skillet over medium-low heat. Add the butter and let it melt gently, watching for a shimmering, golden appearance without browning.
- Once the butter is melted and fragrant, add the minced garlic. Sizzle for about 30 seconds until the garlic releases a strong aroma and turns slightly golden around the edges.
- Add the frozen peas directly to the skillet, stirring to coat them evenly in butter and garlic. Cook for 2-3 minutes, stirring occasionally, until the peas turn bright green and are heated through.
- Season generously with salt and freshly ground black pepper. Taste and adjust the seasoning if needed. For a little extra brightness, squeeze in a teaspoon of lemon juice and stir to combine.
- Cook for another 30 seconds to let the flavors meld and the peas glisten with the buttery garlic coating. The peas should be tender but still retain their shape and vibrant color.
- Remove the skillet from heat and sprinkle with freshly chopped herbs for a fresh, herbal note. Serve immediately while the dish is warm, fragrant, and beautifully glossy.
Notes
Pro tips for perfect peas
- Bolded mini-head: Use medium-low heat → Prevents garlic from burning and keeps flavors gentle.
- Bolded mini-head: Add peas in stages → Ensures even coating and prevents overcrowding in the pan.
- Bolded mini-head: Smell for fragrant garlic → Signals it’s ready; remove if aroma turns bitter.
- Bolded mini-head: Taste before seasoning → Adjust salt and pepper to balance the richness of butter.
- Bolded mini-head: Finish with acid → Lemon juice brightens flavors and adds a fresh note right before serving.
- Bolded mini-head: Watch for glossy peas → Indicates they’re heated through and coated properly, not overcooked.
- Bolded mini-head: Use a wide skillet → Allows peas to cook evenly and easily toss without spilling.
Common mistakes and how to fix them
- FORGOT to turn down heat → Keep heat moderate to prevent garlic burning.
- DUMPED peas all at once → Add peas gradually, stirring to coat evenly.
- OVER-TORCHED garlic → Remove from heat immediately if garlic turns brown.
- SKIPPED tasting → Taste and adjust seasoning before serving.
Quick fixes and pantry swaps
- When sauce looks greasy → Splash a splash of water or lemon juice to shimmer and loosen.
- If garlic burns quickly → Patch with a spoonful of butter and lower heat immediately.
- DUMPED peas all at once → Add in stages, stirring gently to coat evenly and avoid clumping.
- Overcooked peas → Shield with a lid and reheat briefly; they should stay bright and tender.
- If dish lacks brightness → Squeeze fresh lemon or add a pinch of salt for an instant lift.
Prep, store, and reheat tips
- Prep the garlic and measure butter ahead—store in small containers in the fridge for up to 2 days. The aroma of garlic infused in butter is best fresh, but these prep steps save time.
- Freeze leftover cooked peas in an airtight container for up to 3 months. The vibrant green may fade slightly, but they’ll reheat quickly and retain flavor.
- Reheat peas gently in a skillet over low heat, stirring occasionally, until warmed through—look for a glossy, aromatic appearance. Avoid high heat to prevent overcooking or burning garlic.
- For best sensory experience, reheat just before serving—peas should shimmer with butter and smell fragrant, not burnt or dull.
Top questions about butter garlic peas
1. Can I use fresh peas instead of frozen?
Frozen peas are quick and vibrant, but fresh peas have a firmer texture and sweeter flavor. Use what you have on hand.
2. Can I make this vegan or dairy-free?
Yes, swapping in vegan butter or oil works. The flavor will be slightly different, but it still coats the peas nicely.
3. Should I add lemon juice?
Adding lemon juice right at the end brightens the dish, making it feel fresh and balanced. Skip if you prefer a richer flavor.
4. How do I avoid burning the garlic?
Overcooking the garlic makes it bitter and harsh. Cook until fragrant and golden, then remove from heat.
5. What pan should I use?
Using a wide skillet helps the peas cook evenly and gives space for tossing without spilling. A smaller pan can cause overcrowding.
6. When should I season the dish?
Taste and adjust seasoning after cooking. A pinch of salt and pepper enhances the natural sweetness of peas and richness of butter.
7. How do I reheat leftovers?
Reheat gently in a skillet over low heat, stirring often. Look for a glossy sheen and fragrant aroma to know it’s ready.
8. Can I add spice or chili?
Adding a pinch of red pepper flakes gives a subtle heat. Adjust according to your spice preference.
9. How long can I keep it before serving?
This dish is best served immediately when the peas are bright, glossy, and fragrant. Over time, the texture may soften.
10. What if the peas look dull after cooking?
If the peas look dull or dry, add a tiny splash of water or more butter to revive their sheen and flavor.
This simple dish really emphasizes how a handful of everyday ingredients can turn into something unexpectedly rich and fragrant. It’s the kind of recipe I turn to when I want a quick, satisfying moment that still feels special. The smell of garlic and butter in the air is a small, grounding pleasure that makes the day feel a little brighter.
Whenever I make these peas, I’m reminded that good flavor isn’t about complexity but about care—paying attention to each step and ingredient. It’s a humble dish, but one that’s worth savoring, especially in busy moments or when I need a little comfort. Sometimes, the simplest things leave the biggest impression.

Hi, I’m Jonny Andrew Miller, the cook, taster, and slightly messy mind behind Bite & Boom. I live in Austin, Texas, a city that smells like barbecue smoke, fresh tortillas, and late-night tacos if you wander long enough. It suits me.
