
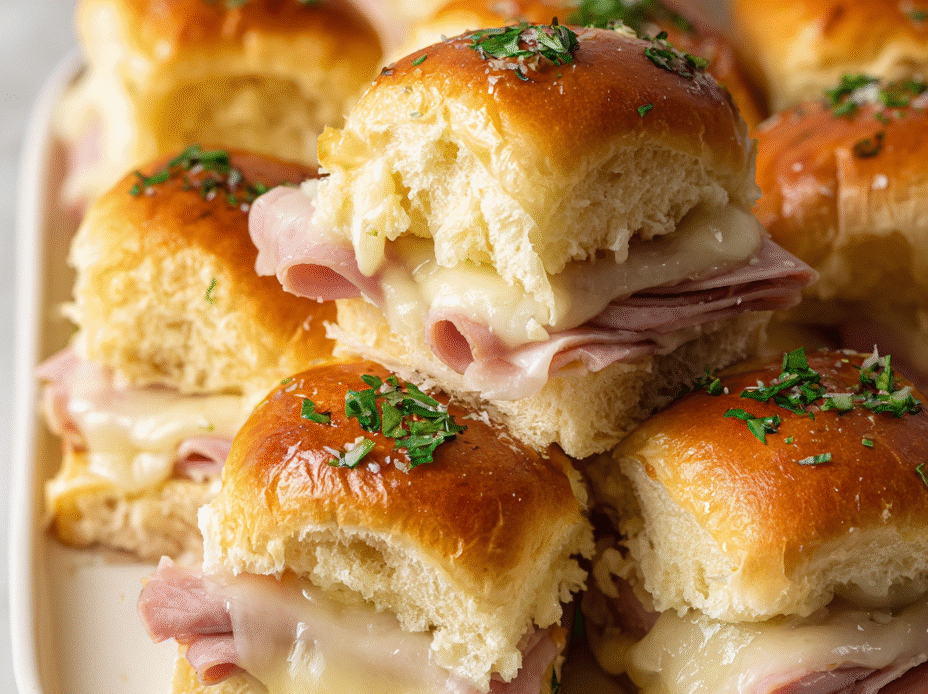
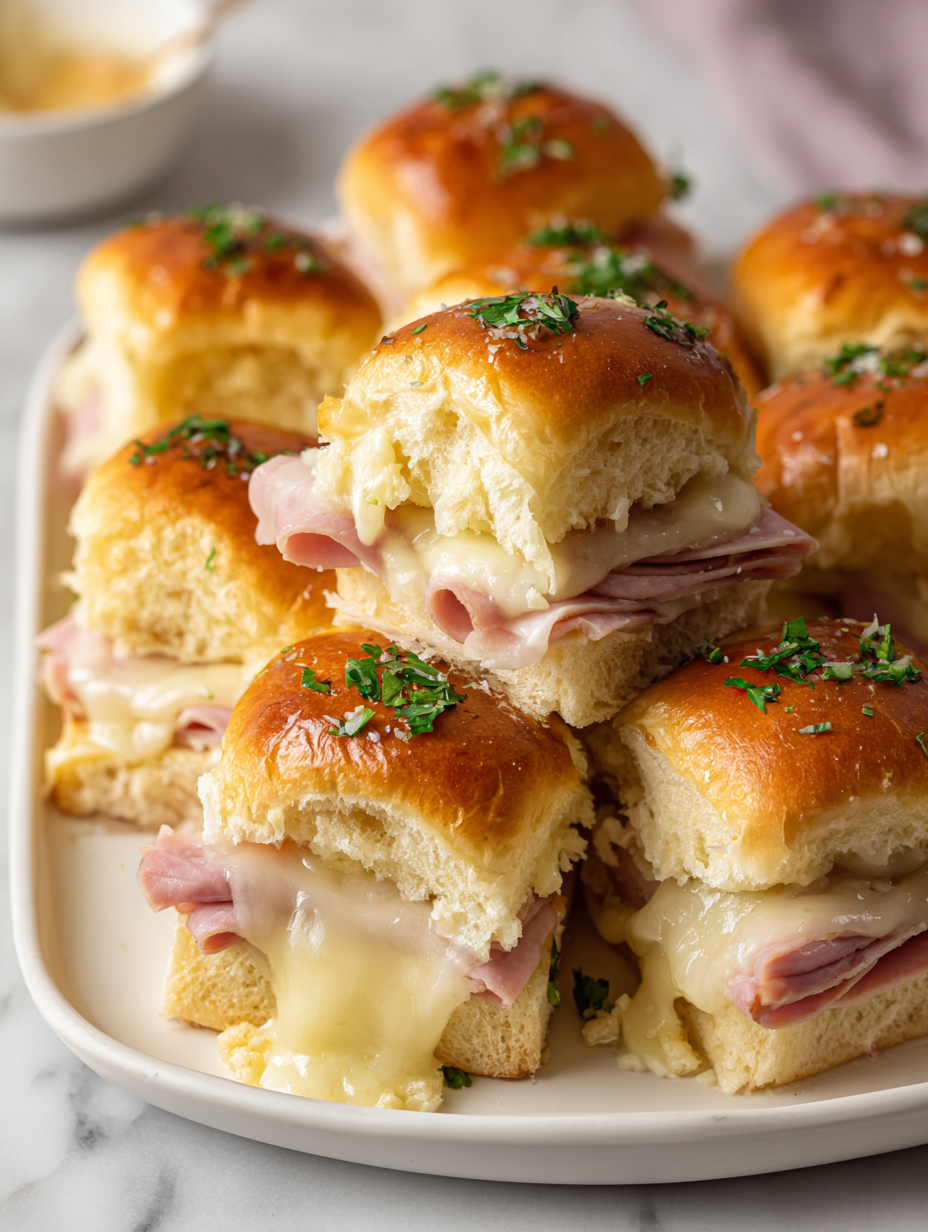
There’s something about melted cheese and ham layered on soft, buttery buns that feels like a warm hug in food form. These sliders are not just quick bites; they’re little pockets of nostalgia, reminding me of family gatherings and lazy weekend afternoons. The gooey, melty cheese pulls apart so satisfyingly, it’s hard not to keep grabbing another.
I love how this recipe turns simple ingredients into something almost indulgent, perfect for chaotic weeknights or quiet, cozy weekends. The smell of baked cheese mingling with ham filling the kitchen has a way of making everyone pause and smile. It’s comfort food that’s easy enough to whip up in a flash but feels special enough to serve to guests.
Focusing on how the gooey, melted cheese and savory ham create a nostalgic, almost melt-in-your-mouth experience that turns simple sliders into a comforting, almost indulgent treat, perfect for sharing in chaos or quiet moments alike.
The story behind this recipe
- This recipe is born from a chaotic weekend when I needed something quick, cheesy, and satisfying to feed a crowd. I remember rummaging through the fridge, finding leftover ham and a block of sharp cheddar, and thinking—why not layer them on soft buns and bake? That moment of improvisation turned into this favorite go-to for busy nights or unexpected guests.
- The first time I made these sliders, the smell alone drew everyone into the kitchen. The cheesy, smoky aroma mingling with the warm ham made it feel like a simple celebration. It’s become a staple because it’s forgiving, flexible, and always tastes like a little moment of joy.
- heading: The story behind this recipe
Key Ingredients and Tips
- Ham: I prefer using thinly sliced honey ham, its sweet, smoky aroma melts beautifully in the oven. Swap with turkey or roast beef if ham isn’t your thing; just watch for dryness.
- Cheddar: Sharp cheddar is my go-to for that punch of flavor and gooey melt. For a milder taste, try Monterey Jack; it’s creamy and less intense, but still satisfying.
- Buns: Soft, buttery slider buns are essential—they get golden and slightly crisp on top. If you want a different texture, brioche works wonders for richness.
- Butter: I melt unsalted butter with a hint of garlic powder—oozy and fragrant, it soaks into the buns. Skip it and the tops won’t brown as nicely, so don’t skip this step.
- Mustard: A quick spread of Dijon adds a tangy kick that balances the richness. Or, if you’re feeling bold, a smear of honey mustard for a sweet contrast.
- Optional Toppings: A sprinkle of poppy seeds or sesame seeds on top adds a bit of crunch and visual pop—use what you have, it’s all about the texture play.
- Seasonings: A dash of paprika or everything bagel seasoning can elevate the flavor. I like to sprinkle some on the butter before baking for extra aroma and color.
Spotlight on key ingredients
Ham and Cheese:
- Ham: I prefer using thinly sliced honey ham, its smoky aroma melts beautifully in the oven. Swap with turkey or roast beef if ham isn’t your thing; just watch for dryness.
- Cheddar: Sharp cheddar is my go-to for that punch of flavor and gooey melt. For a milder taste, try Monterey Jack; it’s creamy and less intense, but still satisfying.
Notes for ingredient swaps
- Dairy-Free: Swap cheese for a vegan cheese slice or omit altogether. Expect less gooeyness but still tasty.
- Meat Variations: Use turkey or roast beef instead of ham for different flavor profiles and slightly leaner options.
- Bread Choices: Substitute slider buns with small baguette slices or gluten-free rolls for variety or dietary needs.
- Butter Alternatives: Olive oil or a dairy-free margarine can be used for brushing; they add a different richness but less melt.
- Mustard: Replace Dijon with honey mustard or skip entirely for a milder, less tangy flavor.
- Cheese Type: Monterey Jack or mozzarella can replace sharp cheddar—less pungent but still melty and satisfying.
- Add-ins: Incorporate sliced pickles or caramelized onions for extra flavor; adjust quantities to taste.
Equipment & Tools
- Sharp knife: To slice buns and layer ingredients cleanly.
- 9×13 inch baking dish: To assemble and bake the sliders evenly.
- Small saucepan: To melt butter and mix in seasonings.
- Pastry brush: To evenly coat the buns with butter mixture.
Step-by-step guide to ham and cheese sliders
- Gather all your ingredients and equipment before starting. Preheat your oven to 180°C (350°F).
- Use a sharp knife to slice slider buns in half horizontally. Keep them intact for easier assembly.
- Lay the bottom halves of the buns in a 9×13 inch (23×33 cm) baking dish, cut side up. Set aside.
- Spread a thin layer of Dijon mustard on the cut sides of the buns for a tangy base. If you prefer more zing, add a little honey mustard.
- Layer slices of ham evenly over the buns, covering all the surface. Use about 1/2 pound (225 g) for a hearty result.
- Top the ham with shredded sharp cheddar cheese, distributing it evenly for gooey meltiness. Use about 1 to 1.5 cups (100-150 g).
- Place the top halves of the buns over the cheese and ham, aligning them well. Press down gently.
- In a small saucepan, melt 1/4 cup (60 g) unsalted butter over medium heat. Stir in 1 teaspoon garlic powder and a pinch of paprika.
- Brush the melted butter mixture generously over the tops of the buns, ensuring even coverage. Sprinkle with poppy or sesame seeds if desired.
- Bake in the preheated oven for 15-20 minutes. Watch for the tops to turn golden brown and the cheese to be bubbly.
- Check for doneness: the cheese should be oozing slightly, the tops lightly browned, and the buns toasted around the edges.
- Remove from oven and let rest for 5 minutes. This helps the cheese set slightly and makes serving easier.
- Slice between the buns to serve. The sliders should be warm, gooey, and fragrant with garlic and melted cheese.
Let the sliders rest for 5 minutes after baking. Slice carefully and serve warm, enjoying the gooey cheese and fragrant garlic butter with every bite.
How to Know It’s Done
- Cheese is fully melted and slightly bubbly.
- Buns are golden and toasted around the edges.
- Filling is hot and oozing when cut.
Ham and Cheese Sliders
Ingredients
Equipment
Method
- Preheat your oven to 180°C (350°F). Use a sharp knife to carefully slice the slider buns in half horizontally without separating them completely, keeping the top and bottom connected.
- Lay the bottom halves of the buns in your baking dish with the cut sides facing up, creating an even layer.
- Spread a thin layer of Dijon mustard on the cut sides of the buns, adding a tangy flavor that complements the cheese and ham.
- Layer the sliced ham evenly over the mustard-coated buns, covering the entire surface for a savory base.
- Sprinkle the shredded sharp cheddar cheese generously over the ham, ensuring even coverage for gooey meltiness.
- Place the top halves of the buns over the cheese and ham layers, pressing down gently to compact everything slightly.
- In a small saucepan, melt the unsalted butter over medium heat. Stir in garlic powder and a pinch of paprika for added flavor and color.
- Using a pastry brush, generously coat the tops of the buns with the melted butter mixture, making sure to cover all the edges for a golden finish. Sprinkle with poppy or sesame seeds if desired.
- Bake the sliders in the preheated oven for 15-20 minutes, until the tops are golden brown and the cheese is bubbling and melted.
- Remove from the oven and let the sliders rest for about 5 minutes. This helps the cheese set slightly and makes slicing easier.
- Slice between the buns and serve warm, enjoying the fragrant, cheesy, and savory layers with every bite.
Pro tips for perfect sliders
- Use a sharp knife to cut buns cleanly, avoiding squished edges and uneven layers.
- When spreading butter, don’t skimp—apply generously to ensure a golden, crispy top.
- Bake just until the cheese is bubbly and tops are lightly browned—keep an eye to prevent overbaking.
- For a more uniform melt, cover the sliders loosely with foil during the last 5 minutes of baking.
- Rest the sliders for 5 minutes after baking—this helps set the cheese and makes slicing neater.
- Use a silicone brush for butter application—quick, even coating without tearing the buns.
- If cheese isn’t melting well, turn up the oven temp slightly (to 375°F/190°C) for a minute or two, then watch closely.
Common mistakes and how to fix them
- FORGOT to check oven temperature → Use an oven thermometer for accuracy.
- DUMPED the cheese mixture → Spread evenly for consistent melting.
- OVER-TORCHED the buns → Cover with foil if tops brown too quickly.
- SKIPPED resting time → Rest sliders 5 minutes before slicing for neater servings.
Quick fixes and pantry swaps
- When cheese isn’t melting → Cover sliders with foil for 5 minutes to trap heat.
- If buns are too soft → Toast them lightly before layering ingredients for extra structure.
- Splash a little water in the oven if tops brown too quickly, then cover with foil.
- Patch dry ham with a dab of mustard or spread for added moisture and flavor.
- Shield cheese from burning by lowering oven temperature slightly and baking longer.
Prep, store, and reheat tips
- Assemble the sliders a day in advance by layering ham and cheese on the buns, then wrapping tightly in foil. Keep in the fridge for up to 24 hours. The flavors meld overnight, and the cheese becomes even more gooey.
- Bake the sliders fresh for best texture, but if needed, reheat in a 180°C (350°F) oven for 10-15 minutes until warmed through and cheese is melty. The smell of garlic butter will perk right up.
- Store leftovers in an airtight container in the fridge for up to 3 days. Reheat in the oven or microwave—expect a softer texture, but still flavorful and satisfying.
- Frozen sliders? Wrap assembled sliders tightly in foil and freeze for up to 2 months. Thaw overnight in the fridge before baking. The cheese might be a little less gooey, but the aroma and flavor hold strong.
- Reheating tips: For that fresh-from-the-oven feel, cover with foil and warm at 180°C (350°F) for about 10 minutes. The tops should shimmer with a golden sheen, and the cheese will be irresistibly oozy.
Top questions about ham and cheese sliders
1. What kind of ham works best?
Look for thinly sliced ham with a smoky aroma for best melt and flavor. You can swap with turkey or roast beef if you prefer a different taste, but watch for dryness.
2. Can I use different cheese types?
Sharp cheddar is my favorite for that gooey, flavorful melt. For a milder option, Monterey Jack offers a creamy, less pungent experience.
3. What buns are best for sliders?
Use soft, buttery slider buns—they toast up golden and slightly crisp. If you want a richer bread, brioche works beautifully for extra indulgence.
4. Why add butter and seasonings on top?
Melted butter mixed with garlic powder and a pinch of paprika gives a fragrant, oozy topping. Skipping this will leave the tops pale and less flavorful.
5. Can I skip the mustard?
Applying a generous layer of Dijon or honey mustard before layering ham and cheese adds a tangy contrast that balances richness. Adjust to your taste for more zing or milder flavor.
6. How do I know when they’re done?
Bake until the cheese is bubbly and tops turn golden, about 15-20 minutes at 180°C (350°F). Look for a slight shimmer and a crackly top for perfect doneness.
7. How long do leftovers last?
Leftovers can be stored in an airtight container in the fridge for up to 3 days. Reheat in the oven at 180°C (350°F) until warm—expect gooey cheese and fragrant butter smell.
8. Can I prepare these in advance?
Assemble the sliders a day ahead, refrigerate tightly wrapped, then bake fresh. Reheating in the oven keeps the buns crispy and cheese gooey.
9. What if the cheese doesn’t melt?
If the cheese isn’t melting well, turn up the oven slightly or cover loosely with foil in the last few minutes. For quick fixes, a quick blast under the broiler works too, but watch closely to avoid burning.
10. Any tips for perfect baking?
Use a sharp knife to slice buns cleanly for neat layers. When brushing with butter, apply generously for an even, golden crust. Keep an eye on baking to prevent over-browning.
These sliders are a reminder that sometimes, the simplest ingredients—ham, cheese, butter—can come together to create something truly satisfying. They’re perfect for when you want a quick, homemade treat that feels a little indulgent without the fuss.
In times like these, when comfort food is needed most, this recipe offers a cozy, cheesy escape. No matter how chaotic the day, a warm bite of these sliders can bring a quiet, satisfying moment to any table.

Hi, I’m Jonny Andrew Miller, the cook, taster, and slightly messy mind behind Bite & Boom. I live in Austin, Texas, a city that smells like barbecue smoke, fresh tortillas, and late-night tacos if you wander long enough. It suits me.
